
[Micro IFO] [Micro Kolibri] [Minor] [Trenton Terror] [Kits]
My Micro Kolibri is the familiar Kolibri design scaled down to 65%. With a ready to fly weight of 39g (1.38oz). Here is a summary of the specifics:
| Plane characteristics | Radio and motor | |||
|---|---|---|---|---|
| Wing span: 49cm (19.3in) | Component | Type | Wt (g) | |
| Wing cord: 17cm (6.7in) | Rx | SkyHooks&Rigging 4 ch | 2.7 | |
| Wing loading: 5.3g/sq.dm (1.7oz/sq.ft) | Servos | 2 @ WES LS-24 | 2x2.9 | |
| Fuse length: 30cm (11.7in)(w/o tails) | ESC | Pixie-Lite | 1.5 | |
| Control: 3 channels (v-tail and throttle) | Battery Pack | 4-cell 50mAh NiCd | 14.8 | |
| Materials: carbon and mylar | Propulsion | KP00 and U-80 prop | 6.0 | |
| Ready to fly weight: 42.7g (1.5oz) | Total wt | 30.8 | ||
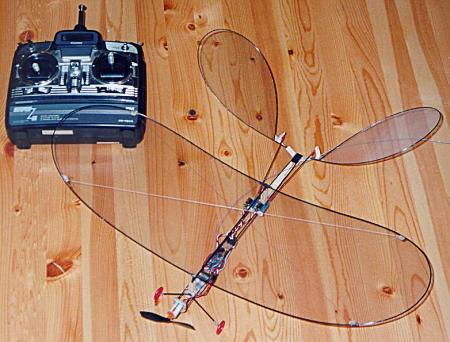
Micro Kolibri, 65% scale Kolibri.
(There are more images of my Micro Kolibri in the Photo Gallery.)
Construction details:
For the general construction I used the article Wayne Hadkins wrote in
E-zone a while back, and just scaled things down. The article on how to
build a full scale Kolibri can be found at the E-zone site.
Below are some of the details on how I scaled it down to make a Micro
Kolibri.
So first off, why 65%? Well the last batch of carbon rods I got from David Lewis were 122cm (4ft) in length, and I wanted to use one rod for the wing. 48inches = 121.9cm minus 2cm for the over lap gives about 119.9 cm for the wing perimeter. The full size is 2 x (95 cm - 2 cm over lap) = 186 cm => 119.9/186 = 0.6447 = about 65%.
Wing
For the wing a used a 1.3mm dia 122cm (4ft) carbon rod. Brought it around
back onto itself and connected the two ends of the rod with about 2cm of
overlap. For the two pieces that are perpendicular in the center that are
used to attach the wing to the fuse, I used 1.5mm dia pieces, 1.3mm
probably would be fine, but I had 1.5mm pieces laying around so I used
them. I attached some threads to give the wing its shape, and then added a
1.5mm rod in the middle of the wing across the center attaching it to the
perpendicular pieces and making an H.
I covered and finished the wing as described in Wayne's article. One thing I should point out is that I originally used regular mono filament type fishing line for the cross threads that form the dihedral. After about a week it stretched enough that the dihedral was about half of what it started out at. I took off the mono filament and put on SpiderWire, Fusion type. The SpiderWire has yet to show any signs of stretching.
Tails
I used 1mm carbon rods for the tails. I scaled the lengths down, and
formed the tail with the plywood triangular pieces. I made the plywood
pieces out of 1/32 inch lite-ply. I did not scale these down at all
because there are pretty small to begin with, and if I scaled them down it
would have been pretty hard to attach the control horns to them.
Fuse (#1)
The first fuselage I made, used three 1mm rods in a triangle type
configuration. I cut the three rods all to the same length and glued them
onto the corners of a short piece (about 3/4in) of 3/16in triangle stock
balsa. I then wrapped some dental floss around them and soaked them with
thin CyA. This formed the back of the fuse.
At the front a made a motor mount for the KP00 out of 1/16in lite-ply. I drilled some holes to accept the three 1mm rods and glued them into place. I reinforced the mount with a little 15 minute epoxy in the back of it where the rods attached. I then added 1/32in lite-ply "spacers" to give the wing hold downs something to attach to. I estimated where they should go from Wayne's drawings. I wrapped the fuse with dental floss in all the places there were spacers, and soaked them with thin CyA.
I made each of the wing hold downs out of two 1/8x1/4x~1.5in pieces of balsa. I etched out a little of the balsa down the middle of each of the pieces and then glued them together. Etching out two pieces and them gluing them together made it quite a bit easier to drill the hole down the center of the hold down, instead of trying to drill down the center of a 1/4in sq piece of balsa. I added an extra spacer half way in between the wing hold downs to add some torsional rigidity to the fuse. Between the back wing hold down and the stock triangle I ended up having to add 1/32in balsa between the rods cross grain, without it the tail was pretty "floppy".
The tail mounts were made out of 3/16in triangle stock balsa about 1/2in in length. I drilled holes down the center of them to accept the 1mm cf rods of the tails, and then CyA'ed them to the triangle stock at the back of the fuse so the angle between the tails was 110°.
Fuse (#2)
After finishing the first fuselage, taxing around, and making a couple of
"short" test flights in my apartment, I decided to make another fuselage.
The tail on the first fuselage was still a little floppy, and the building
process seemed a little more complicated than it needed to be.
The main frame of the second fuselage I built consisted of one 2mm carbon fiber rod. The motor mount was made out of 1/16in lite-ply and reinforced with a couple of small pieces of 1/32in lite-ply and little bit of 15 minute epoxy. The wing hold downs were made the same way as mentioned above and glued onto the 2mm rod. I added a piece of 1/32in lite-ply to the back of each wing hold down. The pieces were in the shape of a right isosceles triangle with sides about 3/4in long. One side was glued to the wing hold down the other to the 2mm rod.
Each tail mount was made out of two pieces of 3/32x3/16x~3/4in balsa. I etched out the middle of each piece and glued them together in the same fashion that I made the wing hold downs. Next I made two isosceles triangles with a 110° inner angle and a height of about 3/8in out of 1/32in lite-ply. I drilled a 2mm hole in the center of each triangle and then sandwiched and glued the tail mounts between the triangles so that the mounts were running along the two equal sides of the triangle. The whole thing was then glued onto the back of the fuse.
I was pleased with the final result. The new fuselage has much more torsional rigidity, only weighs a couple tenths of a gram more then the original and took less than half the time to build as the original.
Landing Gear (for both fuselage)
The landing gear was made out of 1.5mm rods, (again 1.3mm would have
probably been fine) and some small plastic wheels. The gear was attached
to the front of the front wing hold down.
Radio Gear Installation
A tray made from 1/8in balsa sheeting was added just in front of the back
wing mount to attach 2 WES LS-24 servos to. The rest of the gear more or
less hangs from the fuse, or is taped into place once the CG is in the
right spot.
Flight characteristics:
My Micro Kolibri has very similar flight characteristics to my full size
Kolibri. The Micro Kolibri was under powered with the 3-cell pack I
originally used with it, so instead I went to a 4-cell 50mAh NiCd pack and
get about 3-4 minute flights with it. I also use a 4-cell 120mAh NiMH pack
and get about twice the duration.

Micro Kolibri in its travel box.
[Micro IFO] [Micro Kolibri] [Minor] [Trenton Terror] [Kits]
|
|